Flatness
Capabilities
Coresix maintains a variety of equipment and processes which are capable of fabricating glass from and to a wide range of thicknesses. Though we have limitations within certain processes, the versatility of our equipment allows us to be creative in meeting extreme specifications. The chart to the right is provided as a general guideline for some standard operations.
Tolerances
The glass materials with which we work most often have a wide variety of thickness tolerance (+/-) and total thickness variation (TTV) or parallelism which can be discussed upon request. Coresix can generally improve upon these characteristics through a lapping and polishing process. Though we are capable of tolerances to +/- 10μm, TTV of within a part to 2μm, and TTV from part to part of <5μm, actual capabilities will vary and should be established per part requirements.
Power & Irregularity
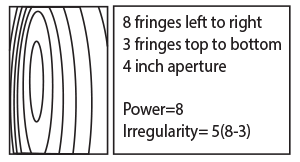
This is a common way of interpreting the results of an interferometer as described the the "fringes" definition above. Counting the fringes from left to right, then top to bottom, the larger number is the "power". Subtract the smaller number from the larger number to get the irregularity. The final number being the size of the aperture, the spec then reads P/I/A. For the example below, the flatness is 8/5/4 (8 fringes power, 5 fringes. As expressed over a defined aperture (ex. 12/12/4 = 12 fringes of power and 12 fringes of irregularity over a four-inch aperture) is measured in newton rings on an interferometer.
Wavelength
The distance between repeating units of a wave pattern. Another way of expressing flatness as defined by the number of Newton rings measured over a given area. (1 wave = 2 fringes)
Arc Minutes and Seconds
Parallelism of top of one surface to another in degrees (1 arc min = 1' = 1/60 deg, 1 arc sec = 1" = 1/60 arc min)
Lambda (λ)
This Greek letter commonly used to designate wavelength.
Stigmatism
Irregularities within the glass which cause an interruption to the transmitted flow of light through the glass.
Fringes
Measured by interferometer, a fringe is a distortion in the surface relative to an optical plane (1 fringe = ½ wave)Using an interferometer with a monochromatic light source, the object part is measured against an optical flat. As light reflects in the gap between the object and the optical flat, the light will interfere with itself creating light and dark fringes or bands. As commonly measured on a helium neon laser at a wavelength of 632.8nm, each fringe is equal to .316 microns. These fringes can be counted to express flatness over a given area or evaluated as a contour map and interpreted for shape and flatness
Microns
A common way of expressing flatness is a peak to valley measurement in microns, either within a specified area or across the entire part. Defines flatness in peak to valley measurement over a given area.
TIR
Total indicator reading is the maximum focal plane deviation relative to a known reference plane.
Bow or Warp
A curve, bend or other deviation from flatness.
Saddle
A negative curvature or irregularity in the glass surface which produces a saddle shape.


